Keep Teaching
Online Teaching Tools and Strategies
Choose tools that will allow students to meet learning outcomes for your course. Try to use tools that students have already used or will likely be familiar with.
- Access and Use Blackboard
- Communicate with Students: Announcements, Email and Discussions
- Make Course Content Available Online
- Using the Content Editor in Blackboard
- Create Lectures with Panopto
- Conduct Synchronous (Live) Course Sessions with Blackboard Collaborate
- Collect Assignments: Blackboard Assignments, Turnitin and SafeAssign
- Assess Student Learning: Quizzes, Exams and Proctoring (Respondus and Honorlock)
- Foster Communication and Collaboration Among Students: Discussions and Group Work
- Sustain Lab Activities
Access and Use Blackboard
You may login to Blackboard with your CSU ID and CampusNet password at csuohio.edu/center-for-elearning/blackboard-login. You can also find the link to Blackboard in the A to Z index on the MyCSU Homepage. To get started, you may want to explore the short, self-paced course: Introduction to Teaching with Blackboard. This course will take 15 to 20 minutes to complete and goes over the basics in Blackboard.
All courses at CSU have a blank shell automatically created in Blackboard each semester. We recommend you consider using the CSU Course Template as a starting point for your Blackboard course. The template contains information for students on university resources and how to get technical help as well as guides for faculty on communicating important administrative information for the course (Communication Policy, Grading Policy, etc.). The CSU Course Template also contains a sample module faculty can use as a guide to set up course content.
You will want to make sure you make your course available when you are ready for your students to have access.
Communicate with Students
Your communication with students will be imperative to ease anxiety and provide clear instruction in the event of an emergency. You’ll need to notify students of changes in schedules, assignments, and broader course expectations. Early and consistent communication can reduce anxiety, and alleviate the amount of repeat questions to be answered by you.
Inform students early and at relevant times: Let them know right away of impending changes, even if you don’t have all the details, and when they will hear more from you. If the University’s messages are timed (e.g. this is the status for the next three days), then provide information to cover the same time period. You don’t want to overwhelm them, but do want to share timely information needed in the time frame at hand.
Set clear expectations: Notify students of how you plan to communicate with them, and how often. The CSU Course Template has a sample Communication Policy you may want to employ. Be clear on what your expectations of the students’ interaction and response times are in addition to informing them of your own. Be clear in your written instructions for assignments.
Consider your communication load: The likelihood of receiving individual questions that would be pertinent to the class as a whole is high. Consider sending replies to frequently asked questions to the class as a whole, or creating a General Questions discussion board in Blackboard that you instruct students to subscribe to. Encourage students to post questions in the discussion board so that they will be notified each time there is a question or answer posted rather than emailing you individually.
Communication tools: Blackboard offers tools to allow you to easily communicate with your students. Using tools such as Announcements and Emails are the most direct way to contact students. As noted above, discussion boards can also be used as a communication tool.
Make Course Content Available Online
This section is intended to help you populate and activate your Blackboard course section with essential content in the event of a short or long term need for academic continuity. In the event this action becomes necessary, you will most likely need to provide course content materials, assessments and other materials as you shift your instruction online. The following information is intended to help support instructors in this endeavor.
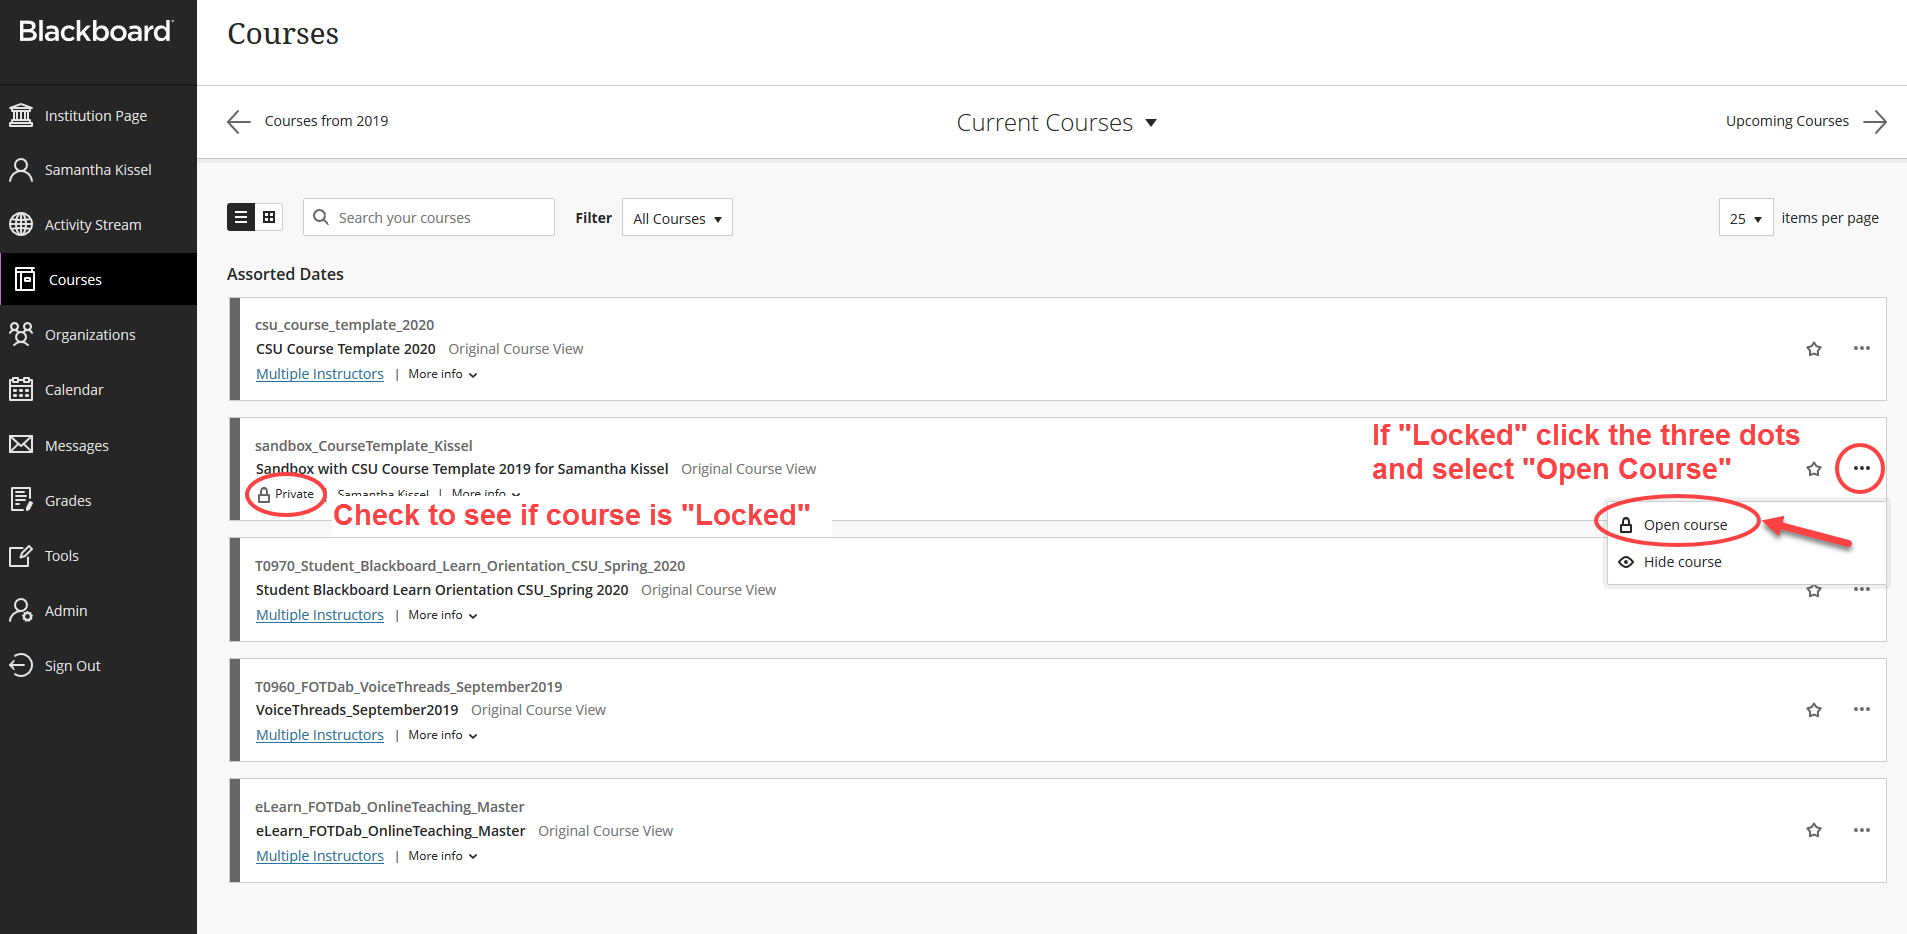
1. Select your Course: Once you have logged into Blackboard, select Courses from the left navigation bar. Select your desired course from the list of courses:

2. Turn On Edit Mode: Turn edit mode on to get access to the menus in Blackboard that allow you to create, add and edit content.
3. Add Course Content: If you are using the CSU Course Template, open the Course Content folder located on the Home Page of your course template. This is the location where students will access the course content you add to this course. (If you are not using the CSU Course Template, please go to Step 4.)
4. Use the action menu: Located at the top of the screen, the action menu contains three content categories with common content types and course tools you will typically use in Blackboard (we are excluding Partner Content): Build Content, Assessments, and Tools. See the table below for tool descriptions within each of these categories. Follow the on-screen prompts to add your course content using these common Blackboard tools as needed.

The Build Content Menu in Blackboard contains tools to set up some commonly used content types, including:
- Content Folder: Use Content Folder to setup folders and sub-folders for organizing your content.
- Item: Use Item to setup content including: attached PDF, Word or PowerPoint files, text written in the content editor (Content Editor in Blackboard), embed multimedia, or insert equations, links, and tables.
- Web Link: Use WebLink to link to an outside website or resource by entering the URL
- Multimedia: Use Multimedia if you need to upload multimedia files (audio, images, video) from your computer. (See Add Multimedia in Blackboard)
- Mashups: Use Mashups to add social media elements from other websites such as:
- Flickr®: Share photographic images.
- SlideShare: Share slide presentations, documents, or Adobe PDF portfolios.
- YouTube™: Share online videos.
- Social Media (Mashups) to Blackboard
4. Using the Content Editor in Blackboard: The content editor appears in all areas where you can add content to your course. ![]() Learn more about using the content editor tools.
Learn more about using the content editor tools.
5. Editing Course Content:
Create Lectures with Panopto
Lecture presentations and demonstrations can be recorded using Panopto for faculty and students who do not use a screen reader. Anyone using a screen reader, such as JAWS, should record presentations with Blackboard Collaborate Ultra. Panopto records input from your internal and external microphones, PowerPoint, your screen, and a webcam. Instructors and students* access Panopto from the left navigation of a Blackboard course.
- Creating a Panopto Video from Blackboard (video)
- Panopto Instructional Videos
- Basic and Advanced Recording Settings (Handout)
- About the Video Editor (Handout)
- Add a Quiz to a Video (Handout)
- Upload a PDF into a Video (Handout)
- Create an assignment in Blackboard that requires students to record and submit a video
Conduct Synchronous (Live) Course Sessions with Blackboard Collaborate
Blackboard Collaborate Ultra is a synchronous video conferencing tool created specifically for classroom instruction that allows you and your students to collaborate in real-time. Lectures, student presentations, live discussion sessions, or office hours can be held using Collaborate.
Instructors are automatically assigned the “moderator” role, which includes the ability to share their screen, upload and present a PowerPoint presentation, share an application, share documents and record a session. Instructors are moderators and students usually enter with the participant role. Students can be given presenter privileges in order to present to one another or moderator privileges to present and record a presentation within a session.
Each Blackboard course has a course-level open session room that anyone enrolled in the course can join at any time. To access, click on Blackboard Collaborate from the left navigation of your course. If you use the Groups tool, each group can receive their own session room also.
![]() Best Practices for Synchronous Online Learning.docx
Best Practices for Synchronous Online Learning.docx
![]() Collaborate Faculty Tutorial (PDF)
Collaborate Faculty Tutorial (PDF)
![]() How to Create Sessions in Blackboard Collaborate for Group Presentations
How to Create Sessions in Blackboard Collaborate for Group Presentations
Note: If you are using Collaborate sessions in your class, we recommend that you record these sessions, should any students have issues with access during the session. If you would like to preserve your recordings for future semesters, you can upload them to Panopto using the instructions below.
![]() Instructions on How to Download a Collaborate Recording and Upload It Into Panopto
Instructions on How to Download a Collaborate Recording and Upload It Into Panopto
- Part 1: Introduction to Collaborate Ultra (Recording Link)
- Part 2: Creating a Session (Recording Link)
- Part 3: Working With the Session Interface (Recording Link)
- See Get Started with Collaborate Ultra for Moderators
- How to setup VOIP audio in Collaborate
- How to caption a Collaborate session
- To request captions for the purpose of accommodation, for a Collaborate recording, please contact Bill Milhoan in the Office of Disability Services, email: g.milhoan@csuohio.edu, phone (216) 687-2377.
Collect Assignments
Use Blackboard to set up assignments (From the Assessment toolbar in Blackboard) that you want your students to submit. You can assign points to assignments and grade assignments through the Blackboard interface. Three types of assignments in Blackboard include:
- Assignments: With assignments, you can create coursework and manage the grades and feedback for each student separately. You can create assignments in content areas, learning modules, lesson plans, and folders. When you create an assignment and assign points to it, a grade center column is created automatically. Student submissions are graded through the Needs grading/grade center interface. (See Create and Edit Assignments in Blackboard)
- Turnitin Assignments: Turnitin is an originality checking and plagiarism prevention service used by millions of students and faculty, and thousands of institutions worldwide. Turnitin encourages best practices for using and citing other people’s written material. The service offers a complete web-based service to manage the process of submitting and tracking papers electronically, providing better—and faster—feedback to students. Turnitin is integrated with Blackboard and a Turnitin Assignment can be created from the Assessments menu. (See CSU's Collection of Turnitin tutorials)
- SafeAssign Assignments: SafeAssign is another tool for originality and plagiarism prevention. SafeAssign compares submitted assignments against a set of academic papers to identify areas of overlap between the submitted assignment and existing works. Use SafeAssign to review assignment submissions for originality and create opportunities to help students identify how to properly attribute sources rather than paraphrase. (See How to Use SafeAssign in Assignments)
Assess Student Learning – Quizzes, Exams And Proctoring
The Assessment Menu in Blackboard includes tools to set up tests and surveys
- Tests: Use Tests build exams with question types, such as Multiple Choice, True/False, Matching, Calculated, and Essay. Contact the Center for eLearning for assistance with publisher test banks. (See Create Tests and Surveys in Blackboard)
- Surveys: Use Surveys to poll for students’ feedback, opinions and conduct class evaluations. Survey results are anonymous. (See Create Tests and Surveys in Blackboard)
Proctoring options for delivering quizzes and tests include:
Respondus LockDown Browser™ is a custom browser that locks down the testing environment within Blackboard. When students use Respondus LockDown Browser they are unable to print, copy, go to another URL, or access other applications. When an assessment is started, students are locked into it until they submit it for grading.
Respondus Monitor™ is a companion product for LockDown Browser that enables institutions to protect the integrity of non-proctored, online exams. Students use their own computer and a webcam to record assessment sessions, all without leaving the institution's learning management system.
Respondus is offering instructor trainings!
Honorlock
Honorlock is an on-demand proctoring service that requires no additional software or downloads (Google Chrome is the only required software). Honorlock's smart proctoring system integrates seamlessly into Blackboard and allows you to customize exams, monitor performance, and generate robust analytics. Setup is fast, simple, and includes state-of-the-art security features not found in other remote proctoring solutions. You also have the option to offer proctored exams given in ANY third party platform such as Pearson MyMathLab, McGraw-Hill Connect, and WebAssign.
Honorlock Faculty Training and Resources
Foster Communication and Collaboration among Students – Discussions and Group Work
Discussions can be held asynchronously using Blackboard’s Discussion tool. It’s a tool that facilitates communication between students, with the instructor jumping in when needed. Faculty can ask students questions to reflect on reading, introduce themselves, or post questions about the course. Participants can enter text, upload images, create hyperlinks, and attach files to discussion forum posts. These activities can be graded or not. Discussions can be created in the Discussions area from the left navigation, and also added to other areas of the course via the action menu.
Blackboard’s Groups tool can be used for groups of students to collaborate both synchronously and asynchronously using Blackboard’s communication tools. Each group receives their own set of tools and only group members can access content and tools for the group. Faculty can create groups and assign students manually, have Blackboard assign students randomly, or create sign-up sheets.
sustain lab activities
Sustaining lab activities for science, engineering, health care and other courses that rely heavily on lab components, are admittedly hard to reproduce outside of that physical space. Most notably, this is quite difficult with limited lead time and in the event of an unplanned event that requires academic continuity outside the face-to-face lab or classroom. Many academic institutions have considered this challenge in planning for emergencies and the recent events related to the Coronavirus is pushing academic continuity to the forefront of many of those working on contingency plans. This information below, from the Indiana University Keep Teaching website (March, 2020) offers several considerations for continuing course work, possibly even a modified method of performing lab activities, during off-campus academic continuity instruction:
Considerations as you plan to address lab activities (from Indiana University Keep Teaching Website):
- Take part of the lab online: Many lab activities require students to become familiar with certain procedures, and only physical practice of those processes will do. In such cases, consider if there are other parts of the lab experience you could take online (for example, video demonstrations of techniques, online simulations, analysis of data, other pre- or post-lab work), and save the physical practice parts of the labs until access is restored. The semester might get disjointed by splitting up lab experiences, but it might get you through a short campus closure.
- Investigate virtual labs: Online resources and virtual tools might help replicate the experience of some labs (for example, virtual dissection, night sky apps, video demonstrations of labs, simulations). Those vary widely by discipline, but check with your textbook publisher, or sites such as Merlot for materials that might help replace parts of your lab during an emergency.
- Provide raw data for analysis: In cases where the lab includes both collection of data and its analysis, consider showing how the data can be collected, and then provide some raw sets of data for students to analyze. This approach is not as comprehensive as having students collect and analyze their own data, but it might keep them engaged with parts of the lab experience during the closure.
- Explore alternate software access: Some labs require access to specialized software that students cannot install on their own computers. Are there alternate locations or labs where students may be able to access the software.
- Increase interaction in other ways: Sometimes labs are more about having time for direct student interaction, so consider other ways to replicate that level of contact if it is only your lab that is out of commission.