

Creating a new web page from scratch for CMS to display is a fairly straight-forward process. However, there are some steps you must follow in order to display the page correctly.
What you will do
- Use the Content menu to create a new page
- Add content using the Edit area
- Assign your new page to your web site
- Create a menu link for the new page
- Add revision information for the new page
Step by step procedure
Creating the new page
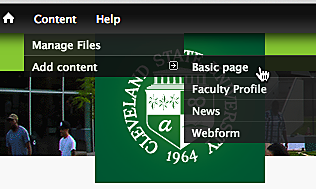
- Click on the Content menu
- Click on Add content
- Click on Basic Page
![]() Please Note: You can also create a new page by:
Please Note: You can also create a new page by:
- Rolling your mouse cursor over the Content menu
- Rolling your mouse cursor down and over Add content
- Clicking on Basic page
Saving your work
The next two steps describe how to title your page and give it a logical URL.
- Give the new page a title by typing in the Title text box
- Don't make your title too long; it will be truncated to form the page's URL.
- If you want your page title to be different from the URL, type it in the Alternate Page Title text box.
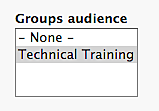
- Scroll down the page to find the Groups audience box. Click on your group name.
- This is a very important step. If you forget to click on your group name before saving, you will no longer be able to edit the page.
- If this should happen, submit an Easy Service incident request to the Web Team. Be sure to notate which page was affected and ask that it be added to your group.
- Click on save.
Creating a menu link
As noted above, the text that is typed into the Title text box will be used to create the new page's URL. It was also mentioned that you can use the Alternate Page Title text box to provide a custom name for the page. You can then craft a more efficient URL for the page by typing it into the Title text box. However, the CMS provides other ways of editing the URL as well as providing roll-over text and assigning the page to a specific position in the menu system.
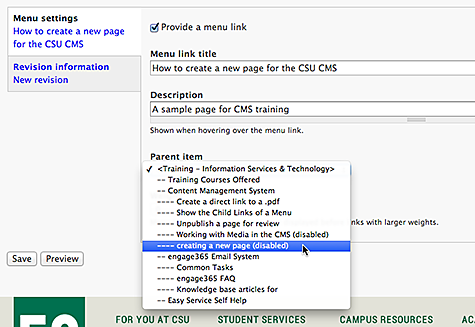
- Scroll down and click on the Menu settings tab.
- Select the checkbox next to the Provide a menu link label by clicking on it.
- Since you have previously entered a title, there should be text already entered in the box. Change the text as desired.
- Example: if the title to the page were to read "How to create a new page for the CSU CMS" the link would be changed to the following
- Click in the Description text box to type in a short description of the page. This will text will appear when a user rolls over the link in the menu.
- Select a position in the menu system by
- clicking on the Parent item drop-down menu, and
- clicking on the existing menu item that your new page should appear under.
Note that the more hyphens a page has the farther down the menu tree it is. Each item with only 23 hyphens is a major link in your site and will appear on the main page in the menu. By default, "Child" pages will not appear in the main page menu.
- If you wish to, you can use the Weight drop-down menu to further specify a position in the new page's menu group (items with the same amount of hyphens). Choosing a low number (negative numbers are lower) will move the page to the top of the group's hierarchy. Selecting a higher number (close to or above 0) will move the new page to the bottom of the menu group. To ensure that a page is always at the bottom or top, give it a very high or very low number.
Adding revision information
After adding your content, it is important to create Revision information. Since the CMS is basically a huge database with a user interface, every time a web page is edited the system stamps the revision with date, time and editor identity information. You should get in the habit of notating what actions you have taken so that you and others can keep track of the work done. The rule should be, if you open a page and change something, note the revision – no matter how small.
- Scroll down the page and click on the Revision information tab
- In the Revision log message text box, type a brief description of what you have done.
- Click on Save